Installing vinyl siding may be difficult for some homeowners in Ohio. With its promise of durability and low maintenance, vinyl siding can enhance a home’s exterior. However, the installation process requires learning the specific techniques and the right tools, which can be challenging for those unfamiliar with construction or DIY projects.
You can use this guide to study the installation process, offering clear, step-by-step instructions and helpful tips for a successful outcome. Whether you’re a seasoned handyman or a complete newcomer, you’ll find practical advice and insights that can help transform your home.
What Is Vinyl Siding?
Vinyl siding is a building material used mainly for home exteriors. It is known for its durability, versatility, and low maintenance requirements. Made from polyvinyl chloride (PVC), this type of siding is weather-resistant, long-lasting, and perfect for protecting and beautifying homes.
Vinyl siding is available in a wide range of colors, textures, and styles, allowing Ohio homeowners to achieve their preferred aesthetic. It can look like traditional wood siding but has added benefits such as resistance to rot, insects, and moisture. Its affordability and ease of installation make it an ideal choice for new constructions and renovations.
Vinyl Siding: How to Install Them Step-By-Step
1. Readying the Tools, Equipment, and Materials
Installing vinyl siding requires various tools, equipment, and materials to ensure a successful and efficient process. Here’s a comprehensive list of what to have and prepare:
Tools
|
Hammer |
This is for driving nails into the siding panels and other components. |
|
Tape Measure |
To measure the widths and lengths of siding needed for cuts and proper alignment. |
|
Utility Knife |
For cutting the siding panels to fit around openings and rooflines. |
|
Tin Snips |
Useful for cutting and trimming siding materials, particularly intricate or smaller sections. |
|
Chalk Line |
To create straight, level reference lines on the wall surface. |
|
Level |
To ensure that starter strips, siding panels, and trim are installed evenly. |
|
Circular Saw With a Plywood Blade |
Optional but helpful for making long, straight cuts in the siding. |
|
Jigsaw |
For making precise cuts in the siding, especially around oddly shaped areas. |
|
Snap Lock Punch |
To punch tabs into the cut edges of siding to fit into receiving trim. |
|
Crimping Tool |
For finishing the edges of panels that fit into the top of walls or under windows. |
|
Caulk Gun |
To apply caulk for sealing edges and seams to prevent water infiltration. |
|
Ladder |
To safely reach higher areas of the home. |
Equipment
|
Scaffolding |
Provides a stable platform for working at height, especially useful for multi-story homes. |
|
Safety Gear |
Includes gloves, safety glasses, and a hard hat to protect against injury. |
|
Sawhorses |
To support larger panels while cutting. |
Materials
|
Vinyl Siding Panels |
The main material for covering the exterior surface. |
|
Starter Strips |
Installed at the base of the wall to hold the bottom edge of the first siding row. |
|
J-Channel |
Used around windows, doors, and corners to create a finished edge and manage moisture |
|
Corner Posts |
Installed at the corners of the building to provide a smooth transition between wall sections. |
|
Under-Sill Trim |
Used to secure and cover the cut edges of siding panels under windows and doors. |
|
Fascia and Soffit Pieces |
These may be needed to cover roofline eaves and overhangs. |
|
Corrosion-Resistant Nails |
For attaching the siding to the wall, typically aluminum or galvanized. |
|
House Wrap or Sheathing |
Optional but recommended for additional weather resistance and insulation. |
|
Caulk |
To seal joints and edges against moisture. |
|
Insulation Foam Board |
Optional for improving energy efficiency by adding an insulating layer under the siding. |
2. Prepare the Surface
Before installing the vinyl siding, prepare the wall surface. Start by inspecting the walls to ensure they are smooth and in good condition, and repair any damage, such as rotting wood or loose boards. Remove obstructions like shutters, gutters, downspouts, and fixtures, and remove an old piece of siding if necessary.
Consider installing a weather-resistant barrier or foam insulation for added protection and energy efficiency. Finally, use a chalk line to create level guidelines for the starter strip and other components, specifically near the base of the wall.
3. Install Starter Strips and Corner Posts
Begin by attaching the starter strip at the bottom of the wall. Align it with the chalk line you’ve marked earlier to ensure it’s level, and secure it in place with nails. Next, install the corner pieces at the exterior corners of the house. Make sure these posts are precise and extend slightly below the bottom edge of the starter strip for a secure and even foundation for the siding panels.
4. Install J-Channel and Trim
Place the J-channel around windows, doors, and at the gable ends to create a finished edge and a clean transition between the siding piece and other architectural elements. This channel serves as a component to divert water away and provide a neat appearance.
In areas such as the tops of windows and doors, use under-sill trim to secure and conceal the cut edges of the siding. Doing so will offer a polished look and enhance the integrity of the installation.
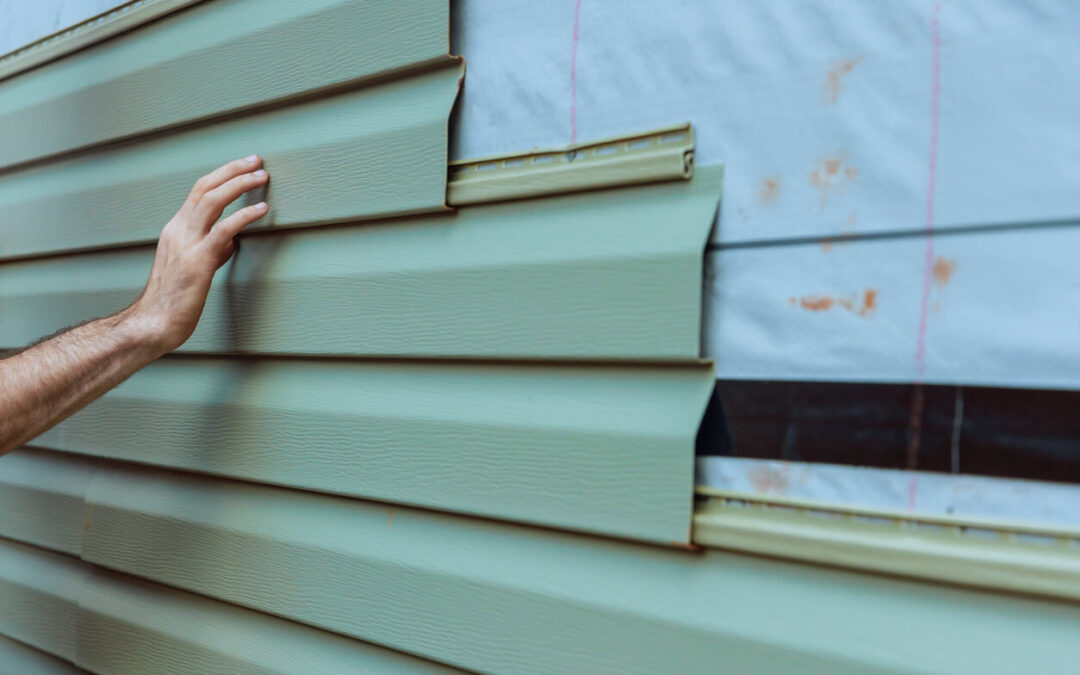
5. Install the Siding Panels
Install the siding by hooking the bottom edge of the first panel onto the starter strip, making sure it’s level, and then nailing it loosely in place. Start from the bottom of the wall and work your way upwards. Make sure to leave a 1/4-inch gap at the ends of the panels to accommodate expansion and overlap the panels by about 1 inch at the joints.
When nailing, use corrosion-resistant nails, leaving approximately a 1/32-inch space between the nail head and the siding’s surface to allow movement. Be sure to drive the nails in the middle of the nail slots and space them roughly 16 inches apart for secure attachment.
6. Work Around Openings
Measure and cut the piece of siding to fit perfectly around windows and doors using a utility knife or tin snips for accuracy. Careful cutting ensures the panels align neatly with the existing structures. Once cut, use J-channel to frame these openings, as it will help secure the siding panels and guarantee a snug fit.
7. Finish at the Top
To complete the installation, you may need to cut the final row of siding panels lengthwise for a proper fit. Once trimmed, you can secure these final panels with under-sill or utility trim, providing a neat and polished finish at the top of the wall. If needed, cover the overhangs with vinyl fascia and soffit pieces to match the siding.
8. Final Touches
Lastly, thoroughly inspect all edges and seams to find gaps. Seal these gaps with caulk to increase your home’s weather resistance, preventing moisture infiltration and improving energy efficiency.
After sealing, reattach previously removed fixtures such as shutters, downspouts, and other exterior elements, making sure they are securely fastened to maintain functionality and appeal.
Benefits of Vinyl Siding Over Other Materials
- Affordability. Vinyl siding is generally less expensive than other materials like wood or brick. This makes it suitable for those who are on a strict budget.
- Low Maintenance. It only needs minimal upkeep compared to other materials, as it doesn’t need painting or staining. A simple wash with soap and water is usually enough to keep it looking clean and fresh.
- Durability. Vinyl is resistant to common issues such as rot, peeling, and insect damage, offering long-lasting protection for your home.
- Weather Resistance. Vinyl siding can handle weather conditions, including harsh sunlight, heavy rain, and strong winds, protecting the home’s structure over time.
- Variety of Styles and Colors. It comes in a wide range of colors, textures, and styles, letting homeowners achieve various looks, from traditional to modern, without compromising personal preferences.
- Energy Efficiency. When combined with proper insulation, vinyl siding can improve a home’s energy efficiency by adding another layer of protection against temperature fluctuations.
- Easy Installation. Compared to some other materials, vinyl siding is relatively easier to install, which can reduce labor costs and installation time for professionals and DIY enthusiasts.
- Environmental Impact. Many vinyl siding products are now made from recycled materials, and the low maintenance requirements mean fewer resources are needed for upkeep.
Is Vinyl Siding Difficult to Install?
Even if learning how to install vinyl siding on a house through different tutorials and instructional materials, remember that it still presents certain challenges. The installation process requires precision, such as measuring and cutting panels accurately, ensuring alignment, and securing components correctly to allow for expansion and contraction.
Additionally, preparing the underlying surface properly and careful attention to sealing and finishing details are important for a successful outcome. While the installation is not overly complex, achieving a professional-looking result demands patience, attention to detail, and the right tools.
Why and When You Need Permits for Commercial Siding Installation Projects
When undertaking a commercial siding installation project, obtaining the necessary permits guarantees the project complies with local building codes and regulations. Below are reasons why you need a permit and when to get one:
Why Permits Are Important
- Regulatory Compliance. Permits are necessary so that the siding installation meets local building codes and ordinances. These regulations maintain structural integrity, fire safety, and aesthetic standards that align with community requirements. Achieving compliance also avoids legal complications and possible fines that may result from unauthorized construction activities.
- Structural Safety. Given their size, occupancy, and potential structural complexities, commercial buildings must meet higher safety standards. Building permits ensure the installation considers load-bearing capabilities, fire rating, and wind resistance, protecting the structure and its occupants.
- Quality Assurance. By requiring permits, municipalities can only permit licensed and qualified contractors to perform the work. This requirement serves as a check on workmanship quality and prevents substandard installations that may lead to future costly repairs or liability issues.
- Insurance and Liability. Many insurance policies need proof of permits for major renovations or construction projects. Without the proper permits, insurance claims related to the installation may be denied, leaving the business owner financially liable for damages or repairs.
- Resale Value and Property Transactions. Properly documented and permitted projects can positively impact a commercial property’s resale value. During property transactions, potential buyers and lenders will check for compliance records as part of the due diligence process. Lacking permits can complicate sales and lower property value.
When Permits Are Required
- New Construction and Major Renovations. Permits are almost always necessary when undertaking new construction or big renovation projects. This includes installing new siding as part of an overall building project or changing the existing structure’s exterior appearance.
- Structural Changes. If the siding installation involves structural changes, such as altering load-bearing walls or affecting the building envelope (e.g., adding insulation beneath the siding), permits are important. Any work that may affect the building exterior’s integrity will require oversight by local authorities.
- Historical or Landmark Buildings. Additional permits and approvals from historical preservation boards may be necessary for commercial buildings located within historic districts or designated as landmarks. These approvals ensure that any exterior changes preserve the building’s historic character and value.
- Utility and Safety Concerns. The project will need permits if the siding installation impacts utilities (such as modifying connections to electrical, gas, or plumbing systems). Permits maintain safety standards during such modifications.
- Local Jurisdiction Requirements. Permit regulations can vary by location. Even minor siding repairs may require a permit in some areas, while in others, only extensive projects do. It’s important to consult with the local building department to determine specific requirements.
What Is the Most Common Mistake When Installing Vinyl Siding?
One of the most common mistakes when installing vinyl siding is nailing the panels too tightly. This error prevents the siding from expanding and contracting with temperature changes, leading to warping, buckling, or damage over time as the material stresses against itself.
Apart from this, other mistakes may happen during installation:
Ignoring Proper Surface Preparation
It’s important to prepare the underlying wall surface. Failing to repair or smooth out the wall can cause uneven siding, which may not lay flat, resulting in an unattractive appearance. Additionally, ignoring issues like rot or loose boards can create moisture problems, as surface imperfections can let water seep behind the siding, causing long-term damage to the home’s structure.
Miscalculating Expansion Gap
Vinyl siding expands and contracts with temperature changes, so it’s important to leave adequate room for this movement. Not leaving enough space—typically a 1/4-inch gap at the ends of the panels—can lead to cracking or warping. This oversight can compromise the siding’s structural integrity and aesthetic, leading to future repairs or a premature need for replacement.
Incorrectly Installing Starter Strips or Corner Posts
Properly installing starter strips and corner pieces is foundational to a successful vinyl siding job. If these components are not level or plumb, they will affect the alignment of the entire siding installation. Misaligned panels look unprofessional and can create gaps where moisture can penetrate, reducing the siding’s durability.
Overlapping Panels Incorrectly
Vinyl siding panels need to be overlapped correctly—typically by about 1 inch—to withstand outside elements. Incorrect overlapping can cause visible seams that reduce the siding’s aesthetic appeal and increase the risk of wind and water infiltration. This mistake can undermine the siding’s protective function and possibly lead to damage or rot.
Neglecting to Use J-Channel or Trim
J-channel and under-sill trim play key roles in sealing and finishing the edges of vinyl siding around windows, doors, and roofs. Neglecting to use these components can leave spaces through which water can enter, leading to rot or structural damage.
Failing to Check Levelness Frequently
Throughout the siding installation process, regularly check that each row is level. Even small discrepancies can become increasingly noticeable and problematic as you progress. Panel misalignment can detract from the home’s appearance and affect the functional overlap between panels.
Maintenance and Care Tips After Installing the Vinyl Siding
Installing vinyl siding can be a rewarding home improvement project, enhancing your Ohio home’s appearance and durability. However, to achieve a professional-looking finish, you need to avoid common mistakes that may compromise the installation. Here are some maintenance and care tips with brief explanations for each:
- Regular Cleaning. Vinyl siding should be cleaned at least once a year to remove dirt, grime, and mildew. Using a garden hose with a soft-bristle brush or a pressure washer on a low setting can effectively keep the siding looking fresh.
- Inspect for Damage. Periodically check the siding for cracks, warping, or loose panels. Promptly repairing any damage can prevent moisture intrusion and further deterioration.
- Protect From Impact. Take care to avoid hitting the siding with lawn equipment or sharp objects. It prevents dents and scratches that can harm the siding’s appearance and function.
- Check Caulking and Seals. Inspect and replace any degraded or missing caulking around edges and seams. Proper sealing blocks water from seeping behind the siding, which can potentially cause structural damage.
- Maintain Nearby Vegetation. Trim trees and shrubs near the siding to prevent them from rubbing against and damaging the surface. Branches and plants can scratch the siding or cause mildew growth due to excess moisture.
- Handle Repairs Promptly. If any part of the siding becomes damaged, address repairs quickly to prevent escalation into more serious issues. This could involve replacing individual panels or repairing underlying structures.
- Ensure Proper Ventilation. Check the vents and openings for obstructions, permitting proper airflow and reducing the risk of moisture buildup behind the siding.
- Avoid Harsh Chemicals. When cleaning, use mild detergents and avoid harsh chemicals or abrasive tools, as they can damage the siding’s finish and shorten its lifespan.
Gain Expert Siding Assistance in Ohio by Calling Roofs by Warren Right Now!
Even after reading many guides on how to install vertical vinyl siding, applying the knowledge in real life can be difficult for some people. For those who want desirable results on the first try, choose Roofs by Warren to do the job. We have 30 years of roofing experience, guaranteeing that your vinyl siding installation will go smoothly.
When you choose us, expect guaranteed safety, quality results, and regulatory compliance for the vinyl siding installation job. It’s also important that you consult with us, as we can help you learn the proper techniques, use the right tools and materials, and avoid possible accidents. Hiring us also means you want the vinyl siding installation to go smoothly and without problems.
Give us a call right away for a scheduled consultation to discuss how our services can benefit you.